You spend hours perfecting a logo in Adobe Illustrator. The vector paths are crisp, the colors are exact, and the design is exactly what the client wanted. Then comes the moment of truth: you need to send it over, drop it on a website, or hand it off to someone who does not own Illustrator. The AI file suddenly becomes a problem.
This is the situation that makes converting AI to PNG so useful. PNG is one of the most widely supported image formats. Every browser opens it. Every operating system handles it. Most editing tools accept it without any fuss. And critically, it preserves transparency, which matters enormously for logos and brand graphics.
In this guide, we cover everything you need to know about converting AI files to PNG. We walk through what each format actually is, how to prepare your file before exporting, four different conversion methods ranked by output quality, how to maintain transparency, and the mistakes that quietly ruin output quality even when everything else looks right.
What is an AI File and Why Does it Have Limitations?
The AI format is Adobe Illustrator’s native file type. When you create something in Illustrator, such as a logo, an icon, or a detailed illustration, the software saves it as an AI file by default. Understanding what makes these files special also helps explain why they eventually need to be converted.
The Vector Advantage
AI files are vector graphics. Instead of storing an image as a grid of colored pixels, vector files store mathematical instructions that describe shapes, lines, and curves. A circle in an AI file is not a bunch of blue pixels arranged in a circle. It is a formula that says: draw a circle of this radius, fill it with this color.
The practical benefit is infinite scalability. You can take an AI logo and print it on a business card or a billboard, and the quality stays exactly the same. There is no pixelation, no blurring, no degradation. This is why designers use Illustrator to build brand assets that need to live across many different sizes and mediums.
Where AI Files Fall Short
The same specificity that makes AI files powerful also limits them. To open an AI file, you typically need Adobe Illustrator or one of a small handful of compatible programs like CorelDRAW or Inkscape. Most people do not have those installed.
If you send a client an AI file, there is a good chance they cannot open it. If you try to embed it in a website, it will not display. If you upload it to a social media platform or drop it into a Google Slides presentation, it will be rejected or fail silently. The format was built for designers working inside the Illustrator environment, not for broad distribution.
Converting to PNG solves this immediately. You trade the infinite scalability of vector for something far more practical in most sharing contexts: a high-quality raster image that opens on virtually any device, in any browser, in almost any tool.
What Makes PNG the Right Destination Format?
When it comes to converting Illustrator artwork for web use, email sharing, and client delivery, PNG is almost always the right choice. Here is why.
Lossless Compression and What It Actually Means for Your Designs
PNG uses a compression method called Deflate, which reduces file size without throwing away any image data. This is called lossless compression. Every single detail in your original artwork is preserved exactly as it was. Compare this to JPG, which achieves smaller file sizes by permanently discarding color information every time the file is saved. With JPG, quality degrades each time you open and resave the image. PNG never does this.
For design work, lossless compression matters because your artwork has hard edges, precise colors, and fine details that lossy compression would visibly smear or blur.
Transparency Support That Keeps Your Designs Clean
PNG supports full alpha-channel transparency. This means parts of the image can be completely transparent, and other parts can be semi-transparent. For a logo or icon meant to be placed over different background colors, this is essential. You do not want a white box around your logo every time it appears on a dark background.
JPG does not support transparency. GIF supports only one level of transparency (fully on or fully off, with no gradients). PNG is the format that handles transparency correctly and completely, which is exactly what you need for brand graphics.
Universal Compatibility Across Devices and Platforms
Every major web browser renders PNG. Every operating system opens PNG files with its default image viewer. Every design tool, presentation app, document editor, and content management system accepts PNG without any additional software or plugins. This universality is the core reason PNG is the standard format for web graphics, UI assets, and digital brand materials.
AI vs PNG at a Glance
Here is a quick side-by-side comparison of the two formats to help you understand when each one is the right tool.
| Feature | AI (Adobe Illustrator) | PNG (Portable Network Graphics) |
| Image type | Web graphics, icons, and sharing across platforms | Raster |
| Scalability | Infinite, no quality loss at any size | Fixed resolution, degrades when enlarged |
| Compression | Lossless | Lossless (Deflate method) |
| Transparency | Yes | Yes, including semi-transparency |
| Color modes | CMYK, RGB, and others | RGB, RGBA |
| Software needed to open | Adobe Illustrator, CorelDRAW, Inkscape | Any image viewer or web browser |
| Best used for | Brand logos, precision design work | Web graphics, icons, sharing across platforms |
The short version: use AI when you need an editable, infinitely scalable source file. Use PNG when you need to share, publish, or display the design anywhere outside of Illustrator.
Before You Convert: Three Things to Check in Your AI File
Most conversion guides skip straight to the export steps. But what happens before you export matters just as much as the method you choose. Spending two minutes on these checks will save you from re-exporting with wrong dimensions, clipped artwork, or a flat white background where transparency should be.
Check Your Artboard Boundaries
Your artboard defines the boundaries of your exported PNG. If the artboard is too large, you will get unexpected white space around your design. If it is too small, parts of your artwork may be clipped. Before exporting, go to File > Document Setup in Illustrator and confirm the artboard is sized to fit your artwork tightly.
A quick way to fix this: select all your artwork, then go to Object > Artboards > Fit to Artwork Bounds. This snaps the artboard to exactly the bounds of your design.
Flatten or Manage Transparency Layers
Complex blending modes, drop shadows, and transparency effects in Illustrator can behave unexpectedly when rasterized during export. Some effects look correct in Illustrator but render with artifacts or hard edges in the exported PNG.
The safest approach for complex artwork is to go to Object > Flatten Transparency before exporting. This bakes all effects into the flat artwork. One caveat: flattening is destructive, so work on a copy of your file if you want to keep the layered original editable.
Decide on Your Resolution Before You Export
Resolution determines how many pixels per inch (ppi) the exported PNG contains. Getting this right before export means you never have to redo the conversion.
- 72 ppi: Standard for web use and on-screen display
- 150 ppi: Good for presentations and lower-cost printing
- 300 ppi: The industry standard for print-quality output
Setting the resolution too low means a blurry image on high-density screens. Setting it too high for a web graphic results in an unnecessarily large file that slows page load times. Match the resolution to the intended use case before you click Export.
4 Ways to Convert AI to PNG
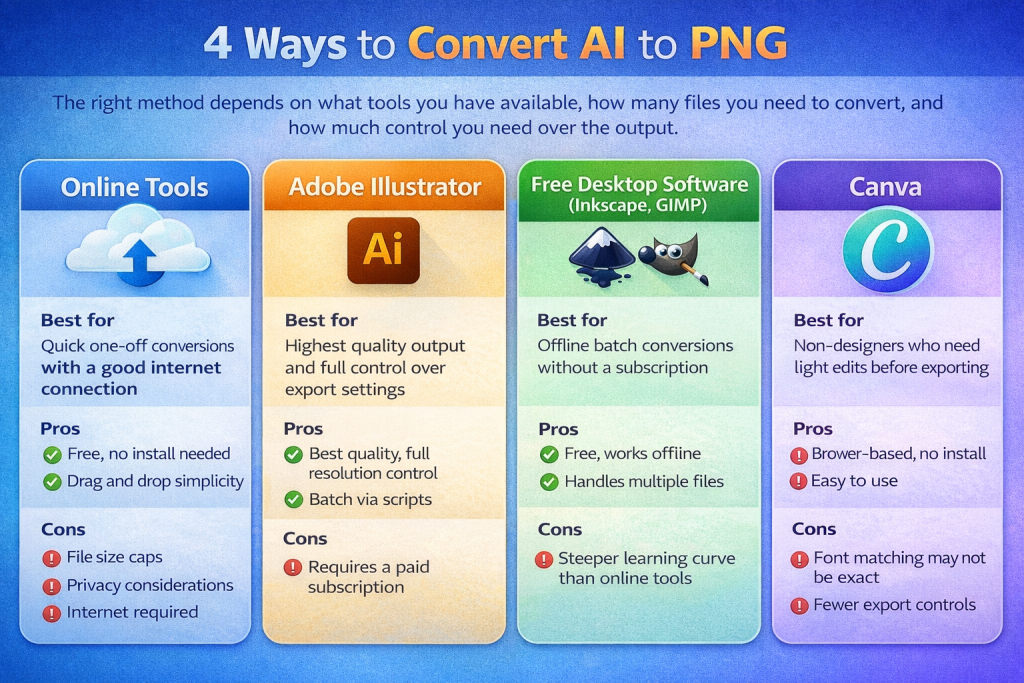
The right method depends on what tools you have available, how many files you need to convert, and how much control you need over the output.
| Method | Best for | Pros | Cons |
| Online tools | Quick one-off conversions with a good internet connection | Free, no install needed, drag and drop simplicity | File size caps, privacy considerations, and internet required |
| Adobe Illustrator | Highest quality output and full control over export settings | Best quality, full resolution control, batch via scripts | Requires a paid subscription |
| Free desktop software (Inkscape, GIMP) | Offline batch conversions without a subscription | Free, works offline, handles multiple files | Steeper learning curve than online tools |
| Canva | Non-designers who need light edits before exporting | Browser-based, no install, easy to use | Font matching may not be exact, fewer export controls |
Method 1: Adobe Illustrator (Best Output Quality)
If you have access to Illustrator, this is the most reliable way to convert. You get full control over resolution, transparency, anti-aliasing, and artboard selection. Here is the step-by-step process.
- Open your AI file in Adobe Illustrator.
- Optional but recommended: go to Object > Flatten Transparency if your file uses complex blending modes or effects.
- Go to File > Export > Export As.
- In the format dropdown, select PNG.
- Check the Use Artboards box to export specific artboards rather than the full canvas.
- Set your resolution. Use 72 ppi for web, 300 ppi for print.
- Under Background Color, select Transparent to preserve the alpha channel.
- Under Anti-aliasing, select Art Optimized for smooth edges on vector artwork.
- Click Export. Your PNG file is saved to your chosen location.
Tip: Illustrator also has an Export for Screens option under File > Export. This lets you export multiple sizes at once, which is useful for UI assets that need to exist at 1x, 2x, and 3x resolutions simultaneously. For web-optimized PNGs with fine transparency control, use Save for Web (Legacy) under File > Export.
Method 2: Free Online Converters (No Software Needed)
Online converters are the fastest option when you have a few files to convert and a reliable internet connection. They require no installation and work from any browser.
Tools worth using: CloudConvert, Convertio, and Zamzar are the most reliable options. All three accept AI files, let you select PNG as the output format, and deliver a downloadable file within seconds.
The basic workflow across all of them is the same: go to the site, upload your AI file, select PNG as the output format, and download the result.
A few things to keep in mind with online converters. Most free tiers cap file sizes, which can be a problem with complex, multi-layer Illustrator files. These tools also upload your file to a third-party server, so be thoughtful about using them with confidential client work or unreleased brand assets. Many converters default to a white background rather than transparency, so check the output settings carefully before downloading.
Tip: CloudConvert gives you more control over output settings than most free tools, including options for resolution and background color. For quick edits before exporting, Canva lets you upload an AI file directly, make changes in the browser, and save as a PNG.
Method 3: Free Desktop Software (Works Offline)
If you need to convert files without an internet connection, or if you regularly process large batches of AI files, free desktop software is a solid option.
Inkscape is the most capable free alternative for this task. It is open-source, opens AI files natively, and exports cleanly to PNG with transparency intact. The Export PNG Image dialog gives you control over resolution and the specific area of the file you want to export.
GIMP works too, though it requires Ghostscript to be installed separately to open AI files. Once set up, GIMP handles batch processing well, which makes it useful if you need to convert a folder full of AI files in one go.
reaConverter is a dedicated conversion utility worth mentioning for teams that do high-volume format conversion as part of a regular workflow. It handles batch AI to PNG conversion offline with minimal setup.
Method 4: Canva (Quick Edits and Browser-Based Export)
Canva is not a traditional AI converter, but it handles this use case well for non-designers or situations where you need to tweak something before exporting. Upload your AI file directly to Canva. It opens in the browser as an editable design. You can adjust elements, swap out text, recolor shapes, and then export as a PNG with one click.
One limitation worth flagging: Canva attempts to match fonts from your AI file, but it does not always find an exact match. If typography precision matters, check the text carefully after importing. For artwork that is primarily shapes and graphics rather than text-heavy design, Canva works well.
How to Keep Transparency Intact During Conversion?
Losing transparency during conversion is one of the most common frustrations when exporting from Illustrator. You export what should be a logo with a clear background, and you get a white rectangle instead. Here is how to prevent it.
In Adobe Illustrator, the key setting is under Background Color in the PNG export dialog. Select Transparent rather than White or any other color. This tells Illustrator to preserve the alpha channel in the output file.
Before you export, turn off in the Layers panel any background layers that use solid fills and are not part of the actual design. Visible background layers get baked into the export even when you set the background to transparent.
After exporting, verify the output by opening the PNG in Photoshop or any image viewer that shows a checkerboard pattern for transparent areas. The checkerboard means transparency is intact. A solid white or gray fill means something went wrong.
If you are using an online converter, look for a background color or transparency option in the settings before downloading. Many converters default to white. Changing this setting to transparent or none before converting is the step most people skip.
Common Mistakes That Ruin the Output
Even when you follow all the right steps, a few easy-to-miss errors can quietly degrade the quality of your converted PNG. Here are the ones we see most often.
Exporting at the Wrong Resolution
Low resolution is the most common reason PNG exports look blurry or soft, especially on retina displays. If you are exporting a logo for a website, a 72 ppi export looks fine on standard screens but blurry on high-density displays that expect 144 ppi or higher. For anything that will appear on modern screens, export at a minimum of 144 ppi or simply use a higher resolution like 300 ppi and let the browser scale it down. Too much resolution is easier to fix than too little.
Forgetting to Outline Fonts Before Exporting
If your AI file contains live text and you convert it using a tool that does not have your fonts installed, you may see font substitution during rasterization. The fix is simple. In Illustrator, select all text, then go to Type > Create Outlines. This converts the live text into vector shapes that render identically everywhere, regardless of whether fonts are available.
Using an Online Converter With a File Size Limit
Complex Illustrator files with many layers, gradients, and embedded graphics can easily exceed 50 MB. Most free online converters cap uploads at 10-25 MB. Check the file size limit of your chosen online tool before uploading. If your AI file exceeds it, switch to Illustrator or Inkscape for the conversion rather than spending time hunting for a tool with a higher cap.
Not Checking the Output Before Delivering It
Always open the exported PNG before sending it to a client or publishing it. Confirm that the transparency is correct, the edges are sharp, and the proportions match your expectations. A thirty-second check after export is much easier than explaining to a client why their logo has a white box around it on the website.
When to Convert AI to PNG and When to Keep the AI File?
Not every situation calls for a PNG. Here is a quick decision guide.
Convert to PNG when you are sharing a final design with someone who does not use Illustrator, publishing graphics to a website, creating icons or UI assets, preparing brand materials for use in presentations or documents, or sending a client a preview of a finished design.
Keep the AI file (or export to SVG instead) when the design needs to stay editable, when you are handing off source files to another designer, or when the artwork will be printed at very large formats, where the infinite scalability of vector genuinely matters.
For teams managing both the original source files and their distributed PNG versions, a digital asset management system makes a meaningful difference. Having the AI file and its PNG exports organized together, tagged, and searchable means the right version is always a quick search away, rather than buried in a folder structure.